What Are the Positions in a Bridge Game? North, South, East and West Explained
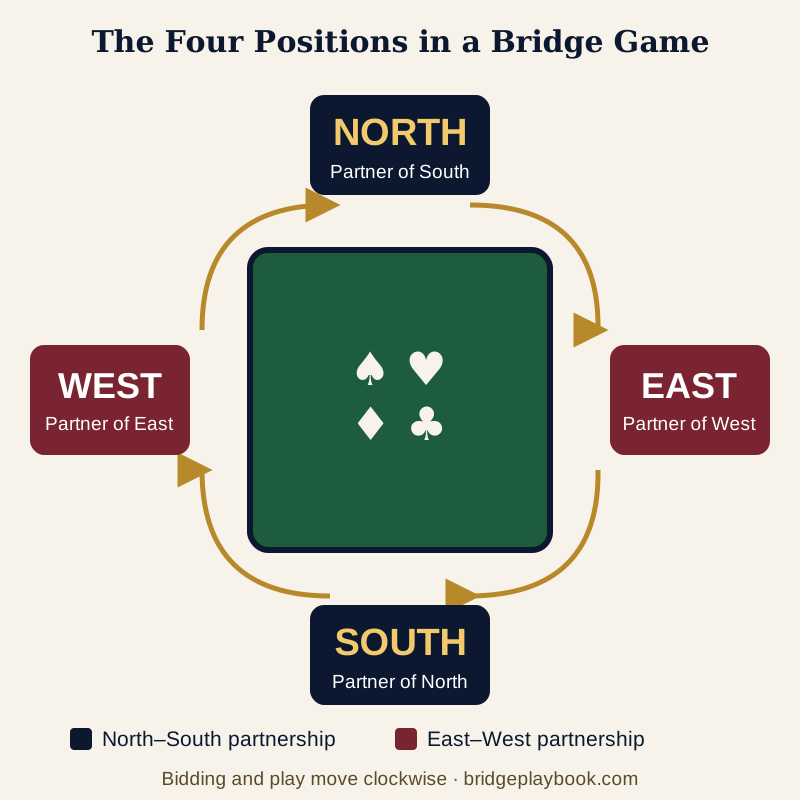
The four positions in a bridge game are North, South, East and West, one for each side of the table. North and South play as partners against East and West. This guide, with a simple diagram, shows how your seat decides when you bid, who leads the first card, and whether you play the hand, lay your cards down as dummy, or defend.
Once the bidding ends, the four seats turn into roles. The player who first named the winning suit or notrump becomes the declarer, their partner becomes the dummy, and the other two become defenders. The dealer always bids first, and the player to the left of the declarer makes the opening lead. You keep the same seat all session, but the deal moves clockwise each hand, so everyone takes a turn as dealer.
Bridge positions and roles in one line
- Partners:
- the player sitting opposite you (North–South, East–West).
- Opponents:
- the two players on your left and right.
- Dealer:
- deals the cards and bids first; rotates clockwise each hand.
- Declarer:
- first player on the winning side to name the final suit or notrump.
- Dummy:
- declarer’s partner; lays their cards face up and makes no decisions.
- Defenders:
- the other two players, trying to defeat the contract.
- Opening leader:
- the defender on declarer’s left, who plays the first card.
- LHO / RHO:
- your left-hand and right-hand opponent.
“Why does everyone have a compass direction?” is one of the first questions new bridge players ask. You sit down at a card table, someone hands you a card that says “South,” and you are not facing south at all. Those four words, North, South, East and West, are simply the names of the four seats, and they are your introduction to how the whole game is organised.
Understanding bridge positions means understanding the game’s structure. It tells you who your partner is, who your opponents are, when it is your turn to bid, who leads the first card, and what role you play during the hand. Get comfortable with positions, and the rest of the game starts to make sense.
What Are the Four Positions in Bridge, and Why Are They Named After Compass Points?
The four positions in bridge are North, South, East, and West. They are named after compass directions for one simple, practical reason: it gives every player a clear, unambiguous label that does not depend on which way the table is facing or where the door is. Whether you play at a club, at the kitchen table or online, the bridge directions are always the same four.
When bridge writers describe a hand, they say “North held the Ace of spades” or “East led a heart.” When a teacher draws a diagram on a whiteboard, North goes at the top, South at the bottom, East to the right, and West to the left, exactly as on a map. That convention is the same at your local club, in a book published in London, and in a tournament in Chicago. A shared language makes the game easier to discuss and learn.
The four players sit at a square table, one on each side. North sits opposite South; East sits opposite West. The players across from each other are partners. The players beside you are your opponents.
♦ ♣
That is the first great truth of bridge positions: the arrangement always creates two partnerships. North–South play together against East–West. Every bid you make, every card you play, you are working with your partner and trying to outsmart the pair across from you.
These bridge game positions work the same way everywhere, from a newspaper bridge column to an online table. Once you know which seat you are in, you know your partner, your opponents, and the order in which everyone bids and plays.
Each position at a glance
| Position | Also called | Sits opposite | Primary role |
|---|---|---|---|
| North | Partner of South | South | Plays on same team as South; may become dummy |
| South | Partner of North | North | Often the declarer in practice examples; partners North |
| East | South’s right-hand opponent (RHO) | West | Defends against North-South; partners West |
| West | South’s left-hand opponent (LHO) | East | Makes opening lead when South is declarer; partners East |
In bridge books and deal diagrams, North-South are usually shown as the declaring partnership when demonstrating bidding sequences or card play. This is a convention: it does not mean North and South always declare in actual play. The partnership that wins the auction becomes the declaring side, regardless of which compass direction they sit.
Does It Matter Which Seat You Physically Sit in at a Bridge Table?
In casual home games, it usually does not matter at all. Players often just take a seat, someone draws a card to decide who deals first, and the game begins. The compass labels are then applied to whoever is sitting in each chair.
In a duplicate bridge club or tournament, however, seat assignments matter a great deal. Boards are pre-dealt and travel from table to table, and the compass positions on each board correspond to fixed seats in the room. North always sits in a particular chair at each table, and the cards in the North hand on board fourteen are the same at every table in the room. This allows all North–South pairs to be compared directly.
If you are playing at home with family or friends, just sit where you like; your bridge position is simply the compass direction given to your chair. If you are visiting a bridge club for the first time, ask which seat is designated North before you sit down, or simply follow the club director’s instruction.
How Does the Dealer Position Work, and Why Does It Rotate?
Every hand of bridge begins with one player dealing thirteen cards to each person, one card at a time, going clockwise around the table. That player is the dealer for that hand.
The dealer has a specific privilege: they are the first person to speak in the bidding. Since bidding is essentially a conversation about the strength of your hand, going first carries a small advantage. You get to open the discussion.
Who Plays First in Bridge?
This is one of the most common beginner questions, and the answer depends on which part of the hand you mean. The dealer starts the bidding, and the auction then moves clockwise. Once the bidding is over, the first card is played by the defender sitting to the declarer’s left; this is called the opening lead. From the second trick onward, whoever won the previous trick leads first.
After each hand is played, the dealer position rotates clockwise to the next player. So if North deals the first hand, East deals the second, South deals the third, and West deals the fourth. Then it returns to North for the fifth. Over time, everyone takes equal turns dealing and therefore equal turns as first bidder.
Dealer rotation order
In duplicate bridge, the deal has already been done before play begins, but the board itself identifies the dealer, and bidding proceeds as though that player had just dealt.
What Does “Declarer” Mean in Bridge, and How Is It Decided?
Once the bidding ends, the player who becomes declarer is determined by a specific rule: it is the player who, for their side, first bid the suit or notrump that became the final contract.
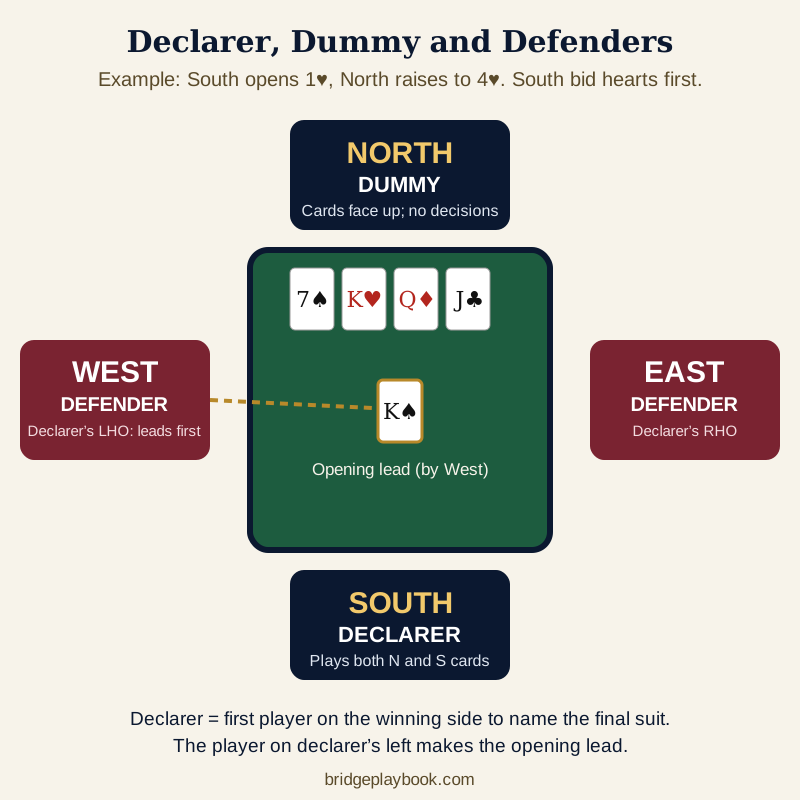
Here is why that matters with a simple example. Say the final contract is Four Hearts. During the bidding, South bid hearts first, perhaps with an opening bid of One Heart, then North raised hearts later. Even though North and South are partners, and either of them could theoretically “play the hand,” it is South who becomes the declarer, because South named hearts first.
This rule exists to prevent a partnership from choosing after the auction who will play the hand. It keeps the game fair and predictable.
The declarer has a significant task ahead: they must win enough tricks to fulfil the contract. They play their own cards and, once the dummy goes down, they also choose every card that is played from the dummy hand.
If you are interested in what the declarer does once play begins, our guide to declarer play tips walks through the key decisions step by step.
What Is the Dummy in Bridge, and What Exactly Does the Dummy Do?
The dummy is the declarer’s partner. Once the first card is led, the dummy places all thirteen of their cards face-up on the table, sorted into four suits, and then steps back from the action entirely.
It feels strange the first time you do it. You have looked at your hand, participated in the bidding, helped choose the contract, and then you have to sit quietly and watch. But the role is not without purpose. The dummy hand gives the declarer extra information and extra resources to work with. Without seeing those thirteen cards, the declarer would be working in the dark.
The dummy sits opposite the declarer. When sorting the cards face-up on the table, tradition says the trump suit (if there is one) goes on the dummy’s right. Cards are placed in columns by suit, with the highest card at the top of each column. This makes it easy for everyone at the table to see what is available.
The word “dummy” comes from an old card-game tradition meaning a silent or absent player. It has been part of bridge and its predecessor whist for well over a hundred years.
Who Are the Defenders in Bridge, and How Do They Work Together?
The defenders are the two players who are not the declarer or the dummy. Their job is the opposite of the declarer’s: they want to prevent the declarer from taking enough tricks to make the contract.
Defending well is often considered the hardest part of bridge. The two defenders cannot see each other’s cards, unlike the declarer, who can see the dummy. They have to communicate through the cards they choose to play, using signals that tell their partner something about their hand without alerting the declarer.
The opening leader
The defender to the left of the declarer plays the first card of the deal, before the dummy is placed face-up on the table. They must choose their card based only on the bidding and their own thirteen cards.
The third hand
The opening leader’s partner is sometimes called the “third hand,” though in practice most players simply refer to each other as “partner” at the table.
If you would like to understand how defenders communicate and plan their defence, our article on defensive signals explains the most common methods used at club level.
What Do LHO and RHO Mean in Bridge?
As you settle into a bridge group or read more about the game, you will quickly encounter two abbreviations: LHO and RHO. They stand for Left-Hand Opponent and Right-Hand Opponent.
These terms come up constantly in bridge discussion because they describe your opponents’ positions relative to you, rather than their compass direction. Your LHO is the player to your immediate left; your RHO is the player to your immediate right.
clockwise
Why does it matter which opponent is on which side? Because bridge moves clockwise. After you make a bid or play a card, the next turn goes to your LHO. The player who leads at the start of each trick is the one who won the previous trick, and whether that is your LHO or RHO changes what options are available to you.
Your LHO
Sits to your left. Play passes through them after your turn.
Your RHO
Sits to your right. They play just before you.
When you become the declarer, your LHO makes the opening lead. That is why bridge teachers often say “the player on declarer’s left leads.” They are referring to the declarer’s LHO.
How Do Positions Change from Hand to Hand?
This is something that genuinely surprises new players. You are South for the entire session. Your bridge position, the seat itself, does not move. But your role changes with every hand.
On one hand, you may be the declarer, managing two sets of cards and trying to make your contract. On the next hand, you might be the dummy, placing your cards on the table and watching your partner play. On a third hand, you could be a defender, working with your partner to defeat the opponents’ contract. Each role is different, each requires different skills, and good bridge players learn to enjoy all three.
As your confidence grows, taking on the declarer role and the defender role becomes more enjoyable. Bridge is one of the few card games where every position teaches you something different about the same hand.
How Does Your Seat Affect Bidding and Opening Lead Decisions?
Your position in bridge is more than a label: where you sit relative to the dealer affects several bidding decisions. In third seat, after partner and one opponent have passed, many players open slightly lighter than normal, often to suggest a good opening lead. In fourth seat, after three passes, you have a choice nobody else had: if you pass too, the deal is thrown in and nobody scores on it. Many players use the Rule of 15 here, opening a borderline hand only when their high-card points plus the number of spades they hold add up to 15 or more.
Your position also affects overcall decisions. In second position (over the opener), overcalls should be sound (good suits with 8-9+ HCP) because the opener to your right will have a chance to rebid and the opener's partner may have a strong hand. In fourth position, when both partners have had a chance to bid, overcalls can be lighter because the auction is likely nearly over.
As a defender, your position determines who makes the opening lead. The player to the left of declarer always leads first. If you are "on lead" (to the left of declarer), you have the most influential defensive decision of the hand. If you are "off lead" (to the right of declarer), your first decision is how to play to partner's opening lead. For complete opening lead guidance, see our defensive signals guide and intermediate bridge tips.
Worked Example: Following Positions Through One Complete Deal
Let us look at a complete hand from start to finish, following how positions work in practice.
The setup
Four players sit down. For this hand, South is the dealer. The cards are dealt. Bidding begins with South and proceeds clockwise: South, then West, then North, then East.
The bidding
The final contract is Four Hearts, bid by North–South. South was the first to bid hearts.
The roles are assigned
Role assignments for this hand
The play begins
West looks at the bidding and chooses an opening lead. Say West leads the King of Spades, hoping to establish a trick for the defence before the dummy goes down. West places that card face-up in the centre of the table.
Now North lays all thirteen cards face-up on the table in four suits, with the heart suit on the right. South studies the dummy and begins to plan.
South (declarer) can see
26 cards: their own hand and the dummy.
West and East can see
Their own 13 cards plus whatever has been played so far.
The hand plays out, with South choosing cards from both hands. In this case, South makes the contract, winning ten tricks out of thirteen.
After this hand
The dealer position moves one step clockwise. On the next hand, West deals. When the bidding ends, West, North, East or South may become the new declarer, depending on who wins the auction and who bid the trump suit first.
Quick-Reference Table: Bridge Positions at a Glance
Keep this table nearby while you are learning. A quick-reference card like this is worth keeping beside you for the first few sessions at a bridge club.
| Concept | Detail |
|---|---|
| Four seat positions | North, South, East, West |
| Partnerships | North–South vs. East–West |
| Partners sit | Opposite each other |
| Opponents sit | On either side of each player |
| Dealer | Deals cards; bids first; rotates clockwise each hand |
| Dealer rotation order | North, East, South, West, then repeat |
| Declarer | Player who first bid the final trump suit or notrump for their side |
| Dummy | Declarer’s partner; places cards face-up; makes no decisions |
| Defenders | The other two players; aim to defeat the contract |
| Opening leader | Defender to the left of the declarer (declarer’s LHO) |
| LHO | Left-Hand Opponent, the player to your left |
| RHO | Right-Hand Opponent, the player to your right |
| Card order | Play proceeds clockwise around the table |
| Who leads first? | Declarer’s LHO (Left-Hand Opponent) |
| Dummy’s trump placement | Trump suit placed on dummy’s right (declarer’s left) |
| Can dummy suggest plays? | No. Dummy observes only. |
Source: Rules and terminology as defined by the American Contract Bridge League (ACBL) and the World Bridge Federation (WBF).
Where Should You Go Next After Learning Bridge Positions?
Once you know who sits where, the next step is the bidding, because the auction decides who becomes declarer and what contract is played. Start with how to play bridge for the whole game in order, then opening bids to see how the dealer starts the auction.
Two free references help at the table: the one-page bridge bidding cheat sheet (PDF) and the bridge scoring chart, which also explains vulnerability. For the words you will hear around the table, see bridge terminology, and for every beginner topic in one place, the Learn Bridge hub.
Key Takeaways
- The four bridge positions, North, South, East, and West, are named after compass directions. It is a universal convention used in all bridge clubs and publications worldwide.
- North and South are always partners; East and West are always partners. Partners sit opposite each other at the table.
- The dealer is the first player to speak in the bidding. The dealer position rotates clockwise after every hand.
- Once the bidding ends, positions give way to roles: one player becomes the declarer, their partner becomes the dummy, and the other two become the defenders.
- The declarer is the player who first bid the suit or notrump named in the final contract, not simply the player who made the highest bid.
- The dummy places all their cards face-up on the table after the opening lead, then plays no further part in that hand. The declarer plays both hands.
- The opening lead is always made by the player to the left of the declarer. This happens before the dummy is placed on the table.
- LHO means Left-Hand Opponent; RHO means Right-Hand Opponent. These terms describe your opponents relative to where you are sitting.
Related Guides
Frequently Asked Questions
The four positions in a bridge game are North, South, East, and West, named after compass directions. Each player sits at one side of a square table and is assigned one of these positions. North and South are partners playing against East and West. Once the bidding ends, positions determine roles: one player becomes the declarer, their partner becomes the dummy, and the other two become defenders.
The four positions are North, South, East, and West, named after compass directions. North and South are partners, playing against East and West. Partners always sit directly opposite each other at the table.
The declarer is the player who, on the winning side, first bid the suit or notrump named in the final contract. If North and South reach a contract of Four Spades, and South was the first of the two to bid spades during the auction, South becomes the declarer, even if North made the last or highest bid in spades.
After the player to the declarer’s left makes the opening lead, the dummy places all thirteen of their cards face-up on the table, sorted by suit. The dummy then plays no further part in the hand and makes no decisions or suggestions. The declarer chooses which card is played from the dummy on every trick.
The opening lead is made by the player to the left of the declarer, before the dummy’s cards are placed face-up on the table. This means the opening leader cannot see the dummy when they choose their card. They must decide based solely on the bidding and their own hand. The opening lead starts the very first trick of the hand.
It depends on the phase of the hand. The dealer starts the bidding, and the auction moves clockwise from there. In the play, the player to the declarer’s left goes first by making the opening lead. From the second trick onward, whoever won the previous trick leads.
Your seat usually stays the same, so if you start as South you stay South. What changes from hand to hand is the dealer, which rotates clockwise, and your role: declarer, dummy or defender, depending on how the auction goes. In duplicate bridge, some pairs move to a new table between rounds, and the director tells you which direction to sit.
LHO stands for Left-Hand Opponent and RHO stands for Right-Hand Opponent. They describe your opponents’ positions relative to your own seat. Your LHO is the player immediately to your left; your RHO is the player immediately to your right. Since bridge moves clockwise, your LHO is always the next player to act after you.
Your partner is the player sitting directly opposite you. If you are South, your partner is North; if you are East, your partner is West. North–South always play together against East–West.
Your opponents are the two players sitting on your left and right. If you are South, your opponents are West (your left-hand opponent, LHO) and East (your right-hand opponent, RHO).
Your position is your seat, North, South, East or West, and it usually stays the same all session. Your role changes every hand: after the bidding you are either the declarer, the dummy or one of the two defenders.
Compass names give every seat a label that does not depend on which way the table faces. Books, newspaper columns, clubs and online sites all use North, South, East and West, so any hand can be described the same way everywhere.